I purchased three 24' class II aluminum extension ladders manufactured by Werner at a sale price of about $115 each. I saved one section for actual use as a ladder inside the observatory and, using 1" x 10 ft. steel electrical conduit (which is a grease & drive fit through the hollow rungs), strung up the other 5 ladder sections on about 6 pieces of conduit making a structure about 10'x12'. I'm sure that you could park a truck on this framework and it can be lifted easily by 2 people. The ladders are held in place on the conduit by using a self tapping sheet metal screw through the rung/conduit at each sleeve point. [ See Photo C ] [ See Photo D ]
The roof travels on two 20' parallel lengths of 2-1/2" x 2-1/2" angle iron ( this always has a bow in one direction but can be easily drawn straight and screwed in place ). The angle iron track is canted to match the roof angle with the "open " side of the angle on BOTH pieces facing "down hill". This is to prevent water from filling the angle and flowing into the observatory or icing up. The tracks are drilled and countersunk for long stainless wood screws to attach to the observatory walls. One should make a simple gauging rod at this point to make sure the rail to rail distance is within about 1/8". The more difficult part was making sure the rails were level as the passed over the house roof which is quite uneven. For this, I welded 1" diameter iron pipe nipples at 4 places along the remaining part of the track making sure they would be over a roof rafter. Each pipe leg had a pipe flange threaded on for mounting to the roof and were about 3" in diameter. To make up the variable gaps between the house roof and the flange base, I found that slicing hockey pucks with a hacksaw to the required thickness made the distance up nicely and they are there forever ! You have to drill the puck slices ( pucks are 3" x 1" and very hard ) and simply apply silicone caulk to both sides of the puck and driving lag bolts through into the rafters. It's amazing how true you can make the rails with this simple minded method. They have not moved in over a year now.
For casters, I bought ten 2" non-swiveling casters and ten 3" non-swiveling casters ( hard plastic, no bearings ) from Home Depot and mounted them in pairs onto ten 1/4" steel plates that I had cut and bent at right angles for $6 each at a small metal working plant in town. The size of the plates before bending is 6" wide and 9" long. Each plate is bent at a right angle so that one leg is 6" and the other leg is 3". These were drilled to hold the casters with the small caster on the short side as a guide roller and the larger caster to carry the bulk of the load on the longer side of the plate. The casters now are at right angles to each other. [ See Photo E ] [ See Photo F ] [ See Photo G ] [ See Photo H ] You should allow about 3/8" for the track to fit into. The steel plates with casters are mounted onto pieces of 3/4" plywood ( about 12" x 18"- side rail width of the ladder ) and sheet metal screwed onto the ends of each ladder with careful alignment of all 10 caster sets. I also put 2 diagonal cables with turnbuckles across the structure to prevent it from going out of square. At this point, the structure is still manageable by 2 people. Just flip it over and get a small crew together to lift it into place on the rails. You can now trim the excess ladder tips to the same lengths and angles and add the vinyl or aluminum trim and the roof sheathing.
Sheathing. To keep the weight down, I sheet metal screwed 2" x 3/4" pine purlins across the ladders at 24" intervals. To this I screwed and caulked opaque white vinyl corrugated roof sheeting which is available in 12' lengths. I open my roof with a chain drive garage door opener which is mounted in one of the lower corners (the 10 ft. optional rail and chain assembly is required). [ See Photo I ] I have moved the roof with 20" of snow on it and it does not torque even thought it is pulled from one corner, not the center. I have a 4" diameter piece of PVC pipe attached to the outer part of the moving roof to cover the exposed chain and its track when the roof is closed. You must modify the drive a bit in that the arm for a garage door comes down and for this application it has to reach up. This is not a big deal to figure out and modify. You still should have a lynch pin to connect the arm to the roof in case of power failure...you just pull the pin to disconnect and pull it shut by hand. [ See Photo F ] [ See Photo K ](photo 6) (photo 7).
For safety in high winds, I have 6 hooks inside with turnbuckles (photo 8). If you ever fear very heavy snow loads, one should make a prop available to put in place from the floor to a center ladder rung during that time.
Electrical wiring for 112 VAC and 18 VDC and video/audio connections are mounted on the pier. I also purchased a 3-step utility ladder and added spring-loaded swivel casters to it for accessing the telescope because of its height. The pier is filled with sand and passes through the observatory floor and bolted onto the concrete floor of the garage below - a total pier height of about 17'. Obviously, with a pier this high, the telescope will vibrate if I bump it, but with the use of the electric focuser and knowing where everything in the observatory is, it has not been a serious problem.
Finally, the use of aluminum in roof construction is one way to keep the weight down. It is conceivable that the extension ladders could be used in other roof configurations besides simply flat or sloped.
And, last but not least, the telescope inside. [ See Photo L ] [ See Photo M ]
B:
C:
D: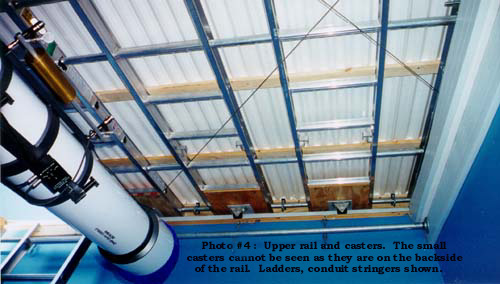
E:
F: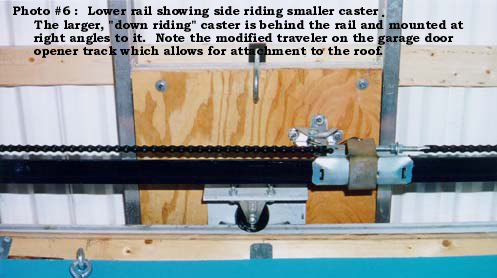
G: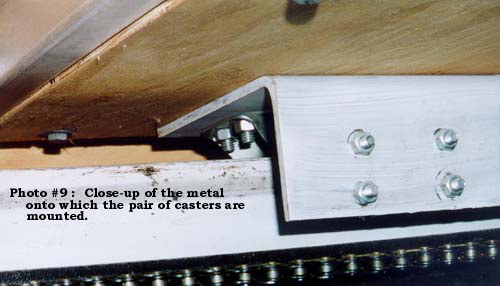
H:
I: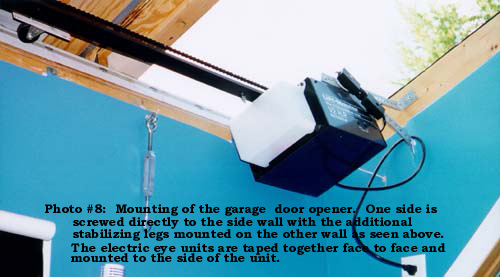
K:
L: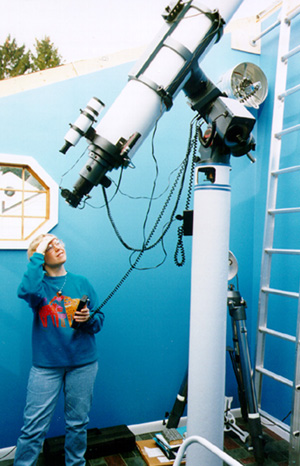
M: